Today’s illuminated magnifiers offer an extensive array of features and functionalities to suit individual preferences, ergonomic concerns, and an ever-expanding range of working conditions and applications. While users appreciate the various options available to them, the choices of lenses, magnification levels, light sources and arm constructions can often be bewildering. What follows are some of the basics… answers to some of the most common questions for selecting a magnifier.
What lens shapes are available on illuminated magnifiers, and what are the advantages and disadvantages of each?
Illuminated magnifiers come with one of two lens shapes: round or rectangular. Until the late 1980s, all illuminated magnifiers featured round lenses. In addition to being relatively inexpensive to manufacture, the round shape proved convenient for use as fluorescent light sources at the time were also round. Once compact fluorescent light sources were introduced however, the importance of maintaining a round-shaped lens lessened and interest in developing rectangular lenses increased.
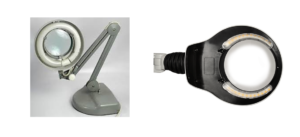
In 1987, the first rectangular lens illuminated magnifier was introduced by Luxo. The primary advantage of a rectangular versus round lens is increased field-of-view. Wide-view rectangular lenses allow a greater viewing area than round lenses which force the user to rely solely on the center, undistorted section of the lens for optimal magnification clarity. Figure 1 illustrates the circular lens of the KFM LED magnifier (left) and the rectangular lens of the WAVE® LED magnifier (right).
For example, on a typical 5” diameter round lens, only a 3” diameter field-of-view in the center of the lens is usable. This means that, as viewed through the round lens, only the very center section is in focus and undistorted. Similarly, on a typical 6” diameter round lens, only a 4” diameter field-of-view is usable. In contrast, a 6¾” x 4½” rectangular lens has a nearly 6” wide usable field-of-view. This is nearly double the field-of-view of a typical 5” diameter round lens illuminated magnifier.
Increased field-of-view offers multiple advantages. First, there are significant gains in productivity for operators spending less time repositioning the board or other item being inspected, or repositioning the magnifier itself. Second, a larger undistorted field of view also means there is less likelihood of overlooking a defect during visual inspection.
Generally, round lens magnifiers feature a 5” diameter 3- or 5-diopter primary lens, although other lens sizes available can measure 6½” in diameter. In contrast, the preferred rectangular lens size is 6¾” x 4½”, the size that ergonomists have determined to optimize viewing area without being intrusive to the work environment.
Regardless of lens shape or size, optical quality, precision ground, white crown glass lenses are preferred on all illuminated magnifiers. This lens standard offers the same optical quality and clarity as prescription eyeglasses. Top quality white crown glass is clear to the eyes, whereas lower quality lenses often appear to have a greenish hue.
What is the difference between magnification and diopter, and how is the level of magnification computed, either alone or when considering an accessory lens?
One of the basic features to consider with any magnifier is its level or power of magnification. This is often denoted by the word “diopter” which identifies the refractive (light bending) capacity of a lens. When diopter is used, as it is with most illuminated magnifiers, the conversion to magnification level is straightforward. To calculate the magnification level of a lens, simply divide its diopter by 4, and add 1. For example, to calculate the level of magnification for a 3-diopter magnifier, simply divide 3 by 4 and then add 1 to get 1.75. In other words, a 3-diopter lens has a 1.75X level of magnification. Figure 2 compares the magnification of a sample with a 3.5-diopter lens (left) and a 5-diopter lens (right).
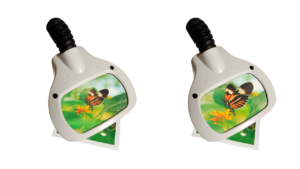
When a secondary accessory lens is added, you simply add its diopter to the diopter of the magnifier’s standard or primary lens, then divide by 4 and add 1. For example, if a magnifier has a 10-diopter primary lens used in conjunction with a 10-diopter accessory lens, the magnification can be calculated by dividing 20 by 4, and then adding 1, to get 6. In other words, a 10-diopter primary lens plus a 10-diopter accessory lens has a 6X level of magnification.
How is focal length related to working distance and magnification?
Focal length is the distance from the center of the lens (or lens system) to the viewed object when in focus. Working distance is measured from the lowest protruding portion of the magnifier below the lens usually, the bottom of the shade or shade housing, to the object when it appears in focus.
As a general rule of thumb, as magnification increases, focal length and working distance both decrease. For reference, they typical focal length of an illuminated magnifier with a 3-diopter lens is 13”, and the typical working distance is between 11½” and 12½”. For an illuminated magnifier with a 5-diopter lens, the typical focal length is 8” and the typical working distance is between 6½” and 7½”.
Choosing the right illuminated magnifier is often a balancing act between level of magnification, field of view, focal length and working distances. Assembly and rework applications tend to need greater working distances as space is needed for tools and maneuverability. Because physical work is not performed under the magnifier during inspection applications, greater field of view and higher magnification levels are more important criteria than working distance.
What are the different light sources available in illuminated magnifiers?
Magnifiers are illuminated by a variety of different lamps or light sources, each providing different attributes and benefits. One of the measurements of a light source is its color or color temperature, measured in Kelvin (K). Preferred LED light sources are a color temperature of 4000K. These are significantly higher, and whiter, than the 3000-3500K of halogen light, the “soft white” light commonly found in home lighting applications.
Traditionally, round lens magnifiers have used a 22-watt T9 circular fluorescent bulb (see Figure 3, left). This older technology is inherently inefficient. Today, high-end magnifiers have integrated LED light sources which are more energy-efficient and higher-output, featuring 2.5X greater light output than the T9. In LED illuminated magnifiers the power supply also provides flicker-free illumination that eliminates the stroboscopic (strobe-like-light) effect on machinery such as a lathe or drill press (see Figure 3, right). Additionally, fluorescent bulbs contain mercury making them a hazardous waste that requires proper disposal.
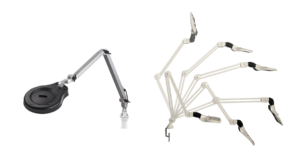
Why are spring-balanced arms commonly preferred over friction-style arms? Are there different types of spring-balanced arms?
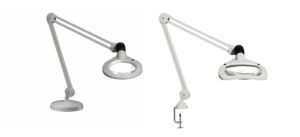
Spring-balanced arms support the full weight of a product without the use of spring-assisted, or friction-style knobs (see Figure 4, right). Such arms can be adjusted into an infinite variety of positions and stay in place with the help of individually calibrated, tempered-steel springs located on the arm itself. In contrast, friction-style arms require the user to tighten and loosen knobs to position and secure the arm (see Figure 4, left). Besides being more difficult to use, such knobs are often ill-situated and poorly applied. Spring-balanced arms afford the magnifier complete flexibility of movement, without the need to tighten the joints to hold the magnifier in place.
In terms of spring-balancing, optimum balance and support can only be achieved through equal length front and back arms. This configuration also allows for full arm retraction and prevents accidental damage during inspection by positioning the magnifier shade slightly above the bench surface. Unequal arm lengths do not position the arm above the work surface and as a result cannot prevent the arm from damaging the item being inspected. Unequal arm lengths do not allow for full arm retraction and as a result clutter the workspace.
In Conclusion
Like the products they magnify, illuminated magnifiers have evolved considerably over the past half century. Today, operators can be highly selective in choosing the correct balance of ergonomic features, magnification levels, lens types, light sources, and arm configurations. Magnifiers can and should be as individualized as the operators that use them. The result is increased productivity and comfort, ensuring that illuminated magnifiers continue to be leveraged as one of the most important tools in any manufacturing environment, cosmetology facility and low vision application.